Tag Archive for: auto scrubber

Autoscrubber Battery Dead

Beyond Normal Battery Maintenance on Automatic Scrubbers

Recently I called on a customer who is having battery issues. The runtime on his automatic scrubber is only about 20 minutes to half an hour and he swears he is doing everything right. He has 4, 6-volt wet cell batteries in his scrubber. The water level in each cell is at the appropriate level, the battery terminals are clean, the cables are clean, and everything looks good. The problem is, he has had the machine for a year and a half and now he is not getting any run time. The scrubber runs for a short period of time and then the batteries fail.

From the information given, you could assume that one or more of the cells in one or more of the batteries has gone bad. And you would be right. But why? The batteries are only a year and a half old. Everything has been done properly. The water levels are right and the cables are tight, everything is clean.

I asked the customer how often he charges the batteries. He said that since he only uses it once or twice a year when he has to scrub and recoat the floors, that’s when he charges it. But he checks the water levels every week and wipes down the entire scrubber including the batteries.

I wish this was not a common problem, but it seems to come up more than I’d like. Batteries need to be charged. If you just let them sit there, they will deteriorate on their own. They will lose power and eventually drain down far enough that you will not be able to get them to charge at all. They will not provide enough power to start the charger. Most chargers today used to charge batteries in an automatic scrubber are fully automatic. They need to read the power remaining in the batteries in order to charge them. If you have left them idle for a few months, maybe even a few weeks, there may not be enough power in the batteries to start the charging process.

The moral of this little story is, Charge your batteries. Even if you are letting your floor scrubber stand idle for long periods of time, Charge the Batteries. If you use your machine every day or every week you will probably not experience this problem for several years. Assuming you maintain the batteries correctly, you should get several years of life out of a set of batteries.

If you do experience symptoms like this, please contact us. There are no guarantees, but we may be able to restore some of the life back in your batteries. If you have questions about how to properly maintain and charge batteries, please contact us. We’ll be happy to walk you through the entire process. Batteries are expensive. Maintain them properly and you should get many years of use out of a good set of batteries.

Contact Us Now!
  • This field is for validation purposes and should be left unchanged.


What Does Your Cleaning Equipment Cost You to Own?

When purchasing equipment to be used to clean your facility there are several factors to consider.  This applies to all types of equipment ranging from vacuum cleaners, floor machines, burnishers, and carpet extractors to larger pieces such as battery powered automatic sweepers and scrubbers.  These factors include the Life cycle of the equipment, the Cost of ownership, the Production rate, and How likely your machine operators are to use it.

This is the second in a 4 part series of what to look for when purchasing a piece of cleaning equipment.  We already addressed the Life Cycle of the Equipment in the first article.  Remember, whatever piece of equipment you choose to purchase, don’t cut corners.  Make sure to demonstrate the equipment in the same conditions under which you will use it on a daily basis.  Make sure it performs under the same daily routine so you won’t experience any misgivings about the equipment’s production or performance.

The Cost of Ownership

This concept is also pretty simple to understand but it can become complicated if you don’t do your homework in the beginning.  The premise is pretty basic.  How much will the equipment I purchase, cost me to operate over the Life Cycle of the Machine?  Many people look at the labor savings alone and justify the purchase on how much the equipment will save them over time. For example, if it takes 1 hour to wet mop 5,000 square feet of floor and your new automatic floor scrubber can clean 30,000 square feet in an hour, you can save 5 hours of labor.  The math is pretty simple.  Multiply the hours saved by your wage and benefits program and you get your cost justification for your new scrubber.  The savings can amount to a substantial number over the course of a year.  But don’t stop here.

Now you have to add the cost to maintain the scrubber back in to get a proper judgment on how much the machine will save.   Warranties usually cover the first 3 years of ownership.  Parts and labor are typically covered for the first year and Parts only are covered for the second and third years.  If you choose to supply your own labor if the machine breaks down, you will have to add that in.  If you choose to contract out your repairs that cost must also be added.

Routine maintenance is a must.  Periodic maintenance should be performed either by your in-house staff or a service supplier for every 100 hours of operation.

Normal wear items should also be included in cost of ownership.  Items like squeegees, brooms, brushes, pads, pad drivers, wheels, rubber skirts, dust control devices, filters, casters and hoses are all items subject to routine replacement.  Although usually covered under the warranty period even vacuum motors may fall under this category.  A vacuum motor will hardly ever last the life of the machine if you are expecting a 7 to 10 year life span.

Other items that will be of concern over an expected 7 to 10 year span include brush motors, drive motors, carbon brushes, control boards, batteries, battery connectors,  electrical cords, cord and hose connectors, switches, solenoids and regulators.  This is by no means a complete list.  It is just an attempt to let you be aware of what might need attention over the life of the equipment.

Once you determine which piece of equipment you are going to purchase, calculate the cost of maintenance to keep the equipment in good running order.  Then calculate any labor savings you are anticipating and determine the difference. This should help you decide which piece of equipment to purchase. The savings in labor should still outweigh the maintenance costs.

To reduce the Cost of Ownership, you may find buying a more expensive machine may save you a lot over years of service. If you are purchasing a machine for a cleaning contract, and are only expecting to get the machine through a contract period, the price may be a bigger issue. If you have difficulty calculating the Cost of Ownership, a qualified equipment distributor should be able to help you with the calculations.
In the next 2 articles I will address Production Rate, and Will Operators Use It?

If you have any questions or concerns please contact us at The Rhiel Supply Company, www.rhiel.com.


Choosing the Right Cleaning Equipment

When purchasing cleaning equipment to be used to clean your facility there are several factors to consider.  This applies to all types of equipment ranging from vacuum cleaners, floor machines, burnishers, and carpet extractors to larger pieces such as battery powered automatic sweepers and scrubbers.These factors include the Life cycle of the equipment, the Cost of ownership, the Production rate, and How likely your machine operators are to use it.  I will address these individually in separate articles.  If any of these factors are questionable, you are probably looking at the wrong piece of equipment for your application.

Cleaning equipment comes in many different brands, shapes, and sizes and are designed to be used in many different applications.  Many cleaning equipment manufacturing companies specialize in niche products to be used in specific applications and are unique to specific cleaning challenges.  These have to be taken into consideration when going through the purchasing process.  In any case, in most situations, equipment should be demonstrated in your facility, on the floor surface to be cleaned, by the piece of equipment you are considering for purchase.  Don’t cut corners.  Use the equipment during the demonstration the way you plan on using it once you own it.  This should eliminate any buyer’s remorse that may occur after the purchase. If you carefully plan what type of equipment you need, how it’s going to operate, how much production you will get out of it, how long it will last and ensure that it fits into your budget requirements, your expectations should be met.  Just plan your decision around the following key factors and the cleaning equipment you purchase should provide the results you want and need.

LIFE CYCLE:

The life cycle is a pretty simple concept.  How many years do you expect to get out of a particular piece of equipment?  There is the old adage “You get what you pay for”, and that is certainly true here.  In theory, the more you pay for a machine, the longer it will last.  But this isn’t always the case.  Look at the components of a particular machine. If the components are the same, the life expectancy should be close to the same.  For example, if a floor machine has a metal triple planetary gear box, 2 capacitors, and safety locks on the handles, you’re probably looking at a decent machine.  The prices may vary by $500.00 or more.

Maybe one manufacturer will use plastic in certain areas, where another will use steel or aluminum. This may be acceptable to you, or maybe the cosmetic metal components are worth the extra price.  If you expect your equipment to withstand a lot of daily abuse, the extra money may be worth the heavier metal components.  You have to decide.  But the real question is, “How long do you want it to last?”.

If you are a private company buying an automatic scrubber who watches its bottom line you will probably say you want it to last as long as possible.  You will perform all the daily, weekly, and monthly maintenance necessary to ensure a long life.  You may be willing to pay more for a machine that lasts longer and your biggest concern is getting the best possible Return On Investment you can on the purchase.

However, if you are a contractor who has to purchase a new scrubber for a cleaning contract, price is a major issue. You may want to invest the least amount you can in a machine that has the potential to last just long enough to complete the contract.  This enables you to increase your profit margin, complete the contract, and not have to worry so much about maintenance expense.

So you see, the type and price of a machine are dependent on your anticipated life cycle.  The average life of an automatic floor scrubber is about 7 years.  But this can vary drastically.  Manufacturers who cater to contractors may build more units with a shorter life span while manufacturers who build for private industry may build equipment with a much longer life cycle.  In any event, make sure you know the type of equipment you need and the duration you will need it.

In the next 3 articles, I will address Cost of Ownership, Production Rate, and Will Operators Use It?

If you have any questions or concerns please contact us at The Rhiel Supply Company, www.rhiel.com.


How to Choose a Qualified Floor Scrubber Distributor

Here are 7 questions you should be asking your self when deciding where to purchase your next automatic floor scrubber. All too often people buy their equipment and then are left out in the cold when any issue arise.

Do they know Floors?

It sometimes seems like modern architects and flooring manufacturers are going out of their way to develop new types of flooring surfaces just because they can.  These floors can be marketed as never having to be cleaned or maintained.  They will last forever and never get dirty.  They may have smooth or textured surfaces, anti-slip coatings and they can pose tremendous problems for the facility that chooses to install them.  If you are purchasing an Automatic Scrubber make sure you purchase one from a company that has been educated and certified on the cleaning processes needed to clean the specific floors in your facility.

Floor Pads, Brushes and Chemicals?

Floor pads, Brushes and chemical play a crucial part in the results you will see from your scrubber.  Which pad or brush to use is critical in getting the cleaning results you want.  Make sure the differences are made clear and the type of pad or brush recommended will work in your application.  Chemical can be even more critical.  The wrong cleaning chemical will not give you the results you want and may even damage your floor.  The wrong chemical can leave residue, make the floor tacky, attract dirt instead of cleaning and ruin the overall appearance.  The wrong chemical may even chemically burn your floor and do irreparable damage.    Make sure your distributor knows which cleaning chemical works best in the scrubber with your floor surface and will give you the results you want.

Knowledgeable Sales People?

Do the salespeople have a good overall knowledge of what an automatic floor scrubber is supposed to do and how they operate?  Do they know the nuts and bolts?  Do they know the machine operation?  Make sure you are talking with a representative that knows how the equipment will react with the floor surface, chemicals, brushes and what results to expect.   The rep should have your best interest in mind, work towards meeting your expectations and not just try to sell you what they have.

Parts, Service, Warranty Support?

Many Janitorial Supply Distributors that sell equipment do not service what they sell.  They use sub-contractors to service their sold equipment. This causes extended downtime, warranty issues because the contractor may not be a warranty certified company, and parts availability issues.  Just because a person can turn a wrench does not mean they are certified to buy parts or service specific pieces of equipment.  Long term support is critical.  Anyone can sell you a scrubber but who will be there in 5 years to repair it when the time comes.

Parts Inventory, Quick Turnaround?

Does the distributor you are talking to have a well-stocked parts department.  You will experience extended downtime if parts have to be ordered every time they repair a machine.  Make sure the parts inventory reflects the number of machines they have sold and they are able to support sold machines quickly and efficiently.

Road Tech, Not just In House Service?

You don’t want to have your scrubber picked up and brought back for repair every time your machine needs routine maintenance. Make sure routine maintenance and small repairs; even big repairs can be done at your facility.  Every day you go without cleaning your floors, dirt accumulates and detracts from the image you are trying to present.  Make sure your distributor can perform repairs quickly and easily at your facility so you don’t have to accept downtime and dirty floors.

Training?

Finally, Make sure equipment training is provided with your purchase.  Training should include machine operator training, brush and pad usage, and chemical usage.  It should also include daily, weekly and monthly maintenance schedules, battery inspections, control issues, and cleaning techniques.  Training should be on going and be provided for as long as you own the machine.

If you have any questions about how to go about looking for an Automatic Floor Scrubber and where to buy one, contact us here at Rhiel Supply.  We’ll be happy to guide you in the right direction.

[et_bloom_inline optin_id=optin_5]

What’s New and Exciting with Tomcat Floor Scrubbers?

Here at the Rhiel Supply Company we have been selling floor cleaning equipment for about as long as floor equipment has been around.  Industrial/Commercial automatic sweepers and automatic floor scrubbers have been a main part of our product line for years.  One of the best lines we have ever sold is manufactured by Tomcat, a division of the RPS Corporation.  This has been some of the best equipment on the market since it was introduced.  We have been a full service sales, parts, and service distributor for over 15 years and the results have been great for us.  One of the big reasons we have had so much success with Tomcat is the durability and reliability that is built into every one of the machines.  They are built on a solid steel frame, unlike many of their competitors who use lightweight plastic.  This means they can be rebuilt over and over again when subjected to harsh applications.  They make great rental machines and have boosted our rental business significantly.  These sweepers and scrubbers are hard working machines that last longer than any I’ve seen in the market in the 35 years I’ve been selling and servicing commercial floor cleaning equipment.

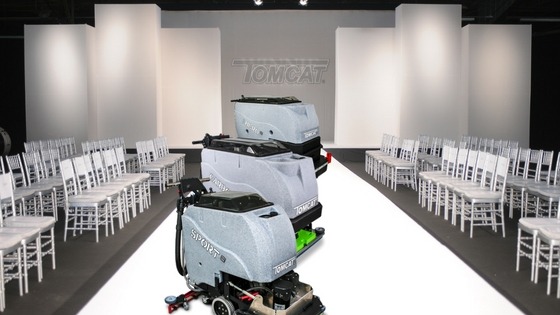
Recently Tomcat has undergone a bit of a face lift.  They committed to a redesign of their top automatic floor scrubbers and the results are even better than I expected.  The new models have more features, more labor saving devices and are simpler to use. All these models perform extremely well while maintaining the high quality, reliability and durability standards we have come to expect from Tomcat.  Let’s take a look at some features that I think make these new models the best on the market.  I’ve been doing this for 35 years and these are the improvements that I believe make these the best there are out there.  This is not an exhaustive study, just a few of the notable features that make these scrubbers the best option to clean, scrub, and prep your floors, no matter what type of facility you may have. Not all of these features are new but they do make Tomcat one of the best floor scrubber lines I have ever used.  Let’s start at the front of the Scrubbers and move to the rear.

Scrub Brushes

All the scrubbers have multiple scrub head options depending on your application.  They all have protective corner rollers and up to 250 lbs. of down pressure.

The standard rotary brush head that incorporates standard pads or rotary brushes have Heavy Duty Motors and the standard Metal Plate Frame.  Aluminum Brush decks resists corrosion.  Gimbal Mounted Brushes insure optimal cleaning on uneven surfaces.

Cylindrical brush heads are great for areas where you need to pick up a lot of debris while you are scrubbing.  This eliminates the need to sweep before you scrub in many instances.  These brushes turn at 750 rpms and do a great job with uneven surfaces like cleaning tile and grout.  They can eliminate the need to dust mop before scrubbing.

EDGE Flat Surface Scrub Heads are great for cleaning relatively flat surfaces on a regular basis.  Full contact pad presser allows you to scrub your floor and gives consistent results without swirl marks.  These scrub heads use 70% less water, allow you to strip floors without chemicals, prep and screen gym floors, reduce slip and fall incidents, and earn LEED Credits.

Vacuum Protection System

This new system provides optimal protection for your vacuum motor.  This means vacuum suction is maintained and water pick-up remains good at all times.   When the dirty water is picked up from the floor it enters the recovery tank through a vacuum hose.  The new Tomcat System runs the water through a drain saver basket before it hits the tank.  This traps any large debris from filling the dirty water tank.  There is also an oversized filter screen and a white vacuum filter cleaning the air of foam and debris.  The air flow then enters a baffling system that eliminates any water or moisture left in the lines from getting to the vacuum motor. This protects the vacuum motor and reduces the risk of premature failure from moisture buildup inside the vac motor.

Solution and Recovery Tanks

Increased tank sizes mean less time stopping to drain and refill.  Tomcat has increased the size of the tanks without reducing the maneuverability of the scrubber.  Tank sizes can be ordered on a new walk-behind scrubber as big as 37 gallons.  This is a significant labor reducing feature when coupled with an EDGE Scrub head which uses 70% less water.

Squeegee Replacement

Squeegees can be a hassle to remove or change.  Now, with a new quick change feature, changing squeegees takes only minutes.  One lever removes the squeegee retainer bracket.  You can then remove, replace, or change squeegee sides and replace the bracket quickly, efficiently, and the squeegee assembly will be level and ready for use.
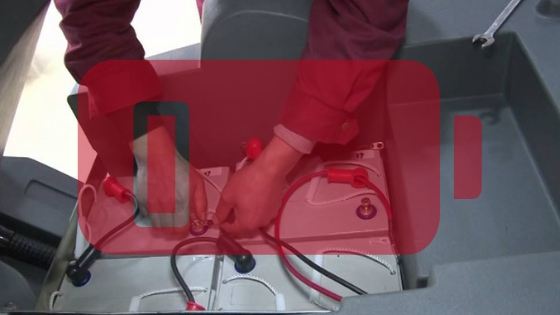
Wheels

Drive wheels, tires and casters come in a variety of options.  Solid, Non-Marking, Pneumatic and Foam Filled are available.  The proper tire will depend on your floor surface.  Caster wheels are also available in different materials depending on your application.

Frame

The frames on Tomcat Scrubbers are all steel plate.  They are coated in corrosion resistant material.  But the frames can also be completely undercoated for more protection or constructed out of a stainless steel plate if you application requires.

Control Panel

The operator’s control panel can be configured in a variety of choices.  Key switches, Lock out Devices, or rocker switches can be used to manage water solution usage, brush down pressure, brush speed, chemical usage, clean out spray jet pumps and a variety of other options to make your scrubber more productive and efficient in your application.

To see one of the new Tomcat models is to believe what they can do.  They provide a better choice for cleaning floors with less labor, less chemical and water usage, reduced brush and pad wear, and less downtime.  Contact us at Rhiel Supply and we’ll demonstrate the appropriate model in your facility.  You can see for yourself how they have earned their reputation.


Tomcat Automatic Floor Scrubbers


My Scrubber is not Moving Forward or Backward

“My Scrubber is not moving forward or reverse. I’m not getting any running time”. This stays in the same theme as a series of posts I did a few months back that covered the most common automatic floor scrubber service requests we receive. To recap the first three

  1. I’m not getting any water on the floor.
  2. My scrubber is not picking up water the way it should
  3. My scrubber is not cleaning the floor properly or at least not the way it did when it was new.

So let’s take a look at why your automatic scrubber may not be moving forward or reverse or not providing the running time you would like to see.

Let’s rule out any mechanical issues. If your scrubber is not running at all it could be something as simple as a key switch, a malfunctioning solenoid or a bad wire connection. If you fix the switch and the machine works just fine we really don’t have an issue, just a broken part that needs replaced. Once we rule out any mechanical issues we get to the source of all power in an automatic scrubber; the batteries. Except for a very few types of scrubbers that plug into the wall for power and run on 110 Volt, AC current, almost all automatic scrubbers today operate on batteries. These batteries are deep cycle, 6 or 12 volt, wired in a series and provide either 24 volts or 36 volts of power for the scrubber. Here is where the problem usually lies. The batteries are the lifeblood of your automatic scrubber. They provide the power for the vacuum motor, power the brushes or scrubbing pads, the control valves that control water flow, the motors that lift the brushes, and the down pressure that is applied to the brushes or pads, sometimes lift the squeegee assembly, and move the machine forward and reverse. All these electrical components draw energy or amps from the batteries. If one of these is drawing too much current, we have a problem. Not only will drawing too much current reduce running time, it may also cause the particular motor to overheat causing premature failure. The battery charger may also be an issue. If it is not putting out the correct current to charge the batteries, the maximum running time will be limited.

Let’s take a look at these one at a time to determine what may be the problem.

Amp Draw:

An automatic scrubber may be able to perform at a high level but this all requires power. If your scrubber is being expected to scrub ramps, with maximum down pressure, and maximum water flow, the amp draw will be significantly higher than normal. This reduces running time. If you are using aggressive brushes on a textured floor surface you may get the cleaning results you want but the amp draw will increase and running time will drop. If you have clogs in your water recovery hoses, this can increase the amp draw in your vacuum motor. Debris caught in your brushes, banding or string wrapped around brushes can also make it harder for your brush motors to turn and increase amp draw. Make sure your auto scrubber is clean, and clear of all debris and you are using the appropriate pads or brushes for your application. This will help achieve longer running time.

Type of batteries:

Standard wet, deep cycle batteries are still the standard when it comes to good operation. If you have recently switched the type of batteries you are using, understand that running time may be affected. AGM or Gel batteries may have an impact on running time or longevity. I will cover this in a later blog. Just realize your machine running time depends on having the correct batteries.

Charging Batteries:

This may seem simple. Plug the battery charger into the automatic scrubber and into the wall outlet. Make sure it turns on, and walk away. Since most battery chargers today are fully automatic this usually works. The battery charger turns on and 6 to 8 hours later your batteries are at full capacity once again. This isn’t always the case as I have seen many times. Make sure the battery charger and the light switch are not on the same circuit. I have seen many times where the operator has plugged in the machine to charge, turned off the lights and left. However, if the light switch and the wall outlet are on the same circuit, the charger turns off when the lights turn off. The operator comes in the next day, turns on the lights, the battery charger comes on again and the scrubber is still charging. Everyone is perplexed as to why the machine isn’t charging and they have no running time. I have also seen instances where a company is having electrical work done. The electrical contractors shut the power off to do their work and the battery charger at the other end of the building turns off because of no power. The battery charger and the scrubber are then blamed for not working properly and I’m called for an unnecessary service call. In addition, when charging batteries, make sure the machine is in a well ventilated area.

Battery Charger:

If the batteries are not charging properly often it is the battery charger. Sometimes it is as simple as a bad fuse. Replace the fuse and the charger is ready to go. Make sure you use the appropriate fuse for the charger. It is often easy to mistake for a standard automotive fuse which will not work. They may look the same but the voltage is different. If it is more than that it is often simpler to replace to replace the entire charger.

Bad Batteries:

Finally, look at the batteries. If batteries are properly cared for, they should last several years and provide the appropriate running time for your scrubber. However even 1 bad cell in a battery can cause problems. Each cell in a battery is 2 Volts. Example, a 6 volt battery has 3 cells, each at 2 volts. A 36 volt system in an automatic scrubber may have 6 batteries, 6 volts each, each battery containing 3 cells. If one cell in one battery is bad, that drops the system to 34 volts to run the machine and that significantly reduces running time. If the scrubber continues to be run this way, it increases the chances another cell may go bad and the power supply is reduced by 2 volts with each bad cell. Eventually the machine will shut down completely and batteries will have to be replaced. To reduce the possibility of batteries going bad too soon follow these simple suggestions. Keep the batteries clean. Wipe off the batteries with a damp cloth after each use. Clean the battery posts to reduce buildup. Make sure the battery cables are tightly clamped onto the posts. Loose cables can cause arching and premature failure. Keep the batteries filled with distilled water. Check the battery levels every week and fill them to the appropriate fill line making sure the lead plates are completely covered. Fill the batteries after charging, not before. Charging raises the water level. If you fill the batteries before charging, the charging cycle may cause the batteries to overflow.

The most important factor is to purchase your automatic scrubber from a reliable, knowledgeable servicing distributor that can assist you with any concerns you may have about the operation or functioning of your scrubber. If you have questions or concerns about your scrubber please contact us anytime on our service and equipment request page. We will assist you in any way we can.


cleaning equipment and floor scrubber service and preventative maintenance

Why Isn’t My Auto Scrubber Cleaning My Floors?!?

This the fourth part of a 5 part series on common problems with automatic floor scrubbers. In the past 3 I covered an overview of all problems to be discussed, a scrubber not putting water down, and when scrubbers aren’t picking water up.

My automatic floor scrubber is not cleaning the floor. We hear this too often. The brushes or pad drivers are working. The vacuum motor is working. The squeegee is down. But the floor is still dirty, streaked, dull, and sticky and just generally doesn’t look very good. So we run routine maintenance on the scrubber and we find the brushes are turning at the proper RPM and with the proper down pressure. The vacuum motor is working and has the proper CFM and Waterlift ratings. The hoses are in good shape. The gaskets are clean. The squeegee is level and we find nothing apparently wrong with the overall operation of the machine. Everything is within the manufacturer’s specifications and functioning well. So why aren’t the floors getting clean?

This is one of the most difficult problems to diagnose because the supplier of the chemical products wants to blame the equipment and the equipment supplier wants to blame the cleaning chemicals. Often times it is a combination of both. If you are purchasing an automatic scrubber for the first time you should also evaluate the type of cleaning chemicals you are using. You may need to change the chemical to get the best use out of the scrubber. This is where the knowledge and experience of your suppliers come into play. Make sure you are dealing with suppliers that can offer the education and training to achieve the results you want. Here are some things to consider.

PADS OR BRUSHES

  • Make sure you are using the correct color and type of pad recommended for your floor surface. You may need to use a more or less aggressive pad to achieve the results you want. Also, check to ensure you are changing the pads frequently. Worn pads will not clean as well and may allow the pad driver bristles to poke through and damage the floor. Same goes if you are using brushes. Match the appropriate brush to your floor surface. Too aggressive and you can damage the floor. Too weak and you may not remove all the dirt. Learn more on pads vs brushes

Pad Pressure

  • Make sure the machine you are using has pressure adjustments. Some scrubbers may only have 1 setting with a predetermined amount of weight on the brush. More pressure means better cleaning but be careful. Too much pressure may damage the floor. The right pressure combined with the right pad or brush may make all the difference. More pressure also means more amp draw and drain on the batteries.

Cleaning Chemicals

  • Cleaning chemicals are needed to clean. They emulsify the soil and hold the dirt in suspension until the squeegee can wipe the floor and remove the dirty water. Without chemical, the floor may streak because the dirt settles too quickly back to the floor. This happens often when the user consistently uses only water to clean. The squeegee will then drag the dirt and smear the floor rather than remove the dirt. In most cases some type of cleaning chemical must be used. Check the ingredients in the chemical you are using. Some neutral cleaners contain solvents that can damage finish and coatings. Disinfectants can also damage and dull the floor. Make sure you are using the appropriate chemical in the right dilution for the floor surface you are trying to clean. Highly finished floors will require a chemical to help increase the shine. Never underestimate the use of a clean water rinse on a floor with a glossy finish. Sometimes, flooding the floor with plain water will restore the shine that has been dulled over time by the residue left behind by disinfectants and cleaners. Dirty, greasy, grimy floors may require a heavier cleaner with a higher ph level. Oily, greasy floors will need a strong degreaser that cleans but doesn’t dull or streak.

Machine maintenance

  • Clean your Automatic Scrubber after each use. Clean out the tanks, debris trays, pads, brushes and especially the squeegee assembly. Dirt will accumulate inside the rear squeegee blade and harden if left to dry. This may scratch the floor surface, streak the floors, and allow trails of water to escape under the blade. This may leave unsightly streaks and discoloration on the floor. Daily auto scrubber maintenance is very important in conjunction with a strong preventative maintenance program.

Finish and coatings

  • What kind of finish are you using? On vinyl tile or terrazzo, the type of finish you choose may require specific cleaning chemicals, pads or brushes. The scrubber doesn’t care what type of brushes or pads you put on it but it may make all the difference in achieving your expectations for how your floor looks. Is the polymer in the finish hard or soft? Does it require burnishing or daily scrubbing? Is it more or less tolerant to chemical usage? On concrete floors, the type of coating may also require different approaches. Is it Acrylic, Urethane or Epoxy? What type of soil is on the floor? How do you want the floor to look after scrubbing? Matching the appropriate chemical, pads, and brushes to the finish or coating is essential to achieving your desired results.

Squeegees

  • If you are not getting the results you want the answer may be in what type of squeegees you have on the scrubber. Are you using Gum rubber, Urethane, Linatex or Neoprene? Maybe something else. The density of the material in the squeegees may make all the difference in the cleaning results you are getting. Make sure they are cleaned after each use to remove the dirt buildup. Also, another good idea is to wipe the blade every few minutes while you are scrubbing to ensure the buildup doesn’t occur during use.

If you are not getting the results you want from your automatic floor scrubber it may not be the fault of the scrubber. There are a lot of other factors to consider. Chemicals, finishes, coatings, pads, brushes, type of soil on the floor, squeegee material and routine maintenance are just a few of the possibilities. An experienced supplier with the knowledge and training programs you need can ensure you get the cleaning results you wish to achieve.

image call to action for service and preventative maintenance


Why Won’t My Automatic Scrubber Pick Up Water?

This is part 3 of a 5 part series on common automatic floor scrubber problems. To recap, the first part is an overview of all the problems discussed and the second part is focused why your scrubber isn’t putting water down and if you’re reading this then you probably are either having issue with your scrubber not picking up water or are interested in learning some of the potential reasons for a scrubber leaving water behind.

Vacuuming up the dirty water on an automatic scrubber hasn’t changed a whole lot since the machines were first developed.  It is basically a vacuum motor pulling air and water through a hose attached to a squeegee on the rear of the scrubber.  The vacuum motor may be a 12, 24 or 36 volt motor, and it may be found in different places in the machine depending on the make and model, but the principle is the same. Some squeegees are lowered by hand and some lower automatically when the machine moves forward with the water control turned on.  Some vacuum motors are turned on with a switch and others turn on automatically when the squeegee is lowered.  Assuming that the vacuum motor is operating and the squeegee mechanism is down, let’s take a look at why you may not be picking up the dirty water.

  • Check to see if the vacuum pickup hose is attached.  It is not uncommon to find a hose that is not completely attached to the squeegee assembly.  This disrupts the airflow and the water doesn’t get sucked up.
  • Check the vacuum hose for holes or air leaks.  Breaks in the hose allow for lost suction and bad water pickup.
  • Make sure the vacuum hose is attached to the recovery water tank at the other end.  Once again checking for air leaks.
  • Make sure the vacuum motor is attached in some fashion to the recovery tank.  This can be a direct connection or through a hose.   An air leak here and you won’t create a vacuum in the recovery water tank.
  • The squeegee assembly should be completely level.  If an operator hit something with the assembly, it may have bent the bracket causing the squeegee to become out of line.  This can create gaps between the squeegee and the floor surface leaving large streaks of water on the floor.
  • Squeegees wear over time.  Worn or torn squeegees do not pick up water well.  Most squeegees can be removed and turned over to use the other side but eventually they all need to be replaced.  Regular replacement will better insure a clean wipe by the blades.
  • Keep the squeegee blades clean.  Remove the assembly and wash it thoroughly after each use.  A good habit to have is to wipe off the inside of the blades periodically while using the scrubber.  This keeps tiny pieces of dirt and grit from accumulating and causing bad streaks.
  • Hoses can clog periodically when picking up large pieces of debris or operating on extremely dirty floors.  Simply run a broom handle down the hose to remove the clog, and then clean out the hose.
  • Back flush the vacuum hose after each use. This will help to prevent clogs from occurring and provide maximum suction to the squeegee assembly.
  • Clean the debris trays or baskets or deflectors in the recovery water tank after each use.   This increases airflow through the hoses for better suction.
  • Clean and check lid gaskets after each use.  Bad or dirty gaskets can cause air leaks and lost suction.
  • Clean the float assembly in the recovery tank and check to see if it is stuck in the closed position.  This will prevent air flow and water pickup.

Water pickup with your automatic scrubber is essentially an easy concept to understand and maintain.  If you do not have good water pickup it is most likely because of worn or clogged hoses, worn squeegees or worn gaskets.  Check for air leaks and obstructions and make sure you have a clean, level wiping surface on your squeegees.

For more information on how you can better maintain your automatic floor scrubber follow our blog and if there is anything else you need help with give us a call or contact us.


cleaning equipment and floor scrubber service and preventative maintenance


Water is Not Coming Out of my Auto Scrubber!?!

I’m not getting water out of my scrubber

This is part 2 of a 5 part series on common problems that can occur with your automatic floor scrubber. If you missed part 1 then you can access it here.

When automatic floor scrubbers were first invented some 60 years ago or so the dispensing of water was pretty simple. There was a hand operated lever near the dashboard of the machine that controlled a cable that opened and closed a solution ball valve near the top of the scrub brushes. The ball valve was gravity fed with water combined with cleaning chemicals from a tank that was positioned above the valve. Open the valve and water came out. Close the valve and the water stopped. Simple process to operate and fairly simple to repair or replace if it broke.

This mechanical system has been replaced on many current production scrubbers. On some models there is an electric pump that pumps water onto the floor or sprays the brushes with chemical solution that is used to wet the floor surface. Machines use filters to clean the water before it hits the floor. They use solenoids that control the water flow and chemical metering systems that pre-mix cleaning chemicals with water. These devices are all controlled through a computer board that regulates the process. This adds to service issues and things that might go wrong over time but these additions make the operator’s job easier and the scrubber more productive and efficient.

Since there are now more things to possibly go wrong this means there is a need for more routine maintenance and the possibility that the cleaning solution just isn’t hitting the floor.

Check these areas first:

  • Check to make sure there is actually water in the solution tank. Believe it or not I have made service calls for customers claiming no water is coming out when in fact no one has filled the solution tank.
  • Make sure there are no obstructions in the clean water solution tank. I have seen automatic scrubbers parked in back rooms of buildings with the tank lids open so the tanks can air out. This is a good routine to have. In reality I have seen these clean water tanks being used as receptacles for cigarette butts, candy wrappers, banana peels and other assorted trash. Keep the obstructions out of the tanks.
  • If the scrubber has a pump and it is not pumping check to make sure the pump is getting power from the batteries. If the pump is bad you will probably need to replace it. These types of pumps are generally not repairable.
  • Most machines today have water filters in the solution line to make sure the water is clean before it continues through the system. This protects the solution control valve and solenoid from damage. These filters accumulate sediment and chemical buildup over time and can prohibit the flow of water. They need to be cleaned regularly.
  • Solenoids are used to regulate the flow of solution onto the floor. This uses less water and is more efficient. Solenoids need power to operate so check to make sure it is getting power from the batteries. If the solenoid is bad simply replace it.
  • The water flow on most machines is controlled by a switch on the dashboard. Check to make sure the switch is operating correctly.
  • The computer board may be bad as well. Check to see if the board is operating correctly. If it isn’t it may be the reason the solenoid, pump or switch isn’t working.

You can see there are many possible elements that exist today on current production models that didn’t exist years ago. They all require routine maintenance. They make these newer automatic scrubbers more efficient and productive and more operator friendly but they also add to your daily routine maintenance checklist.

For more information on your auto scrubber please contact us at our service and PM page. We are here to answer your questions, address your concerns and solve your problems.


cleaning equipment and floor scrubber service and preventative maintenance

Common Problems with Automatic Floor Scrubbers

What are the most common reasons automatic floor scrubbers need service? This will be an overview. The first in a 5 part series of why these cleaning machines break down and require service. Let’s first take a look at a little history and what automatic scrubbers do and how they perform.

Automatic scrubbers have evolved quite drastically over the last 60 years or so. The first floor scrubbers were very simple in mechanical nature but very inventive for the time. (Here is a quick summary on Automatic Floor Scrubber History) They dispensed water from a clean water holding tank, scrubbed the floor with the clean water and added cleaning chemical, and then vacuumed the floor dry with a vacuum system and squeegee mechanism on the back. These 4 areas are where most of the service is needed. Putting down water, picking up water, scrubbing the floor, and operating forward and reverse. It was true 60 years ago and still true today. Although the earlier machines were much simpler in their mechanical design.

Combining the actions of a floor mop, scrub brush and wet/dry vacuum all into one machine. The first scrubbers ran on electric supplied by plugging the machine into a wall outlet, but soon they were using batteries to propel the machine. This made them much more maneuverable and easier to use.

Because these machines combined all the necessary aspects to cleaning a floor, this made the floor cleaning process much more hygienic. Operators were discovering they could use disinfectants, degreasers, and specialized chemicals to aid in creating a cleaner environment. They are great for use in hospitals, schools, government buildings and all places where large groups of people congregate on a hard floor surface. They were soon discovered to be of great use in cleaning factory floors and other large buildings. As the popularity of the automatic floor scrubber grew, so did the complexity of the machines. Constant improvements by manufacturers were made to make the machines more maneuverable, efficient, productive and easier to use for the operator.

Since the first automatic floor scrubbers were fairly simple, the required maintenance was necessary but easy to perform. Clean out the tanks. Clean the brushes. Clean the squeegee assembly and the squeegees and you were pretty much done. There were possibly a few grease fittings to lubricate on a routine basis but that was all.

The scrub brushes were raised and lowered mechanically, usually either with a hand lever or a foot pedal. The operator would let up on the foot pedal to lower the brushes to the floor and push down to raise the brushes from the floor. This was a really simple lever action mechanical system that required very little maintenance. The squeegee mechanism used the same principle. Move a lever to one side with your hand and the floor squeegee lowered, move the lever back and the floor squeegee raised. Once again very little maintenance required.

Solution was dispensed through a mechanical valve that was opened and closed by the operator. The solution valve lever was usually located conveniently next to the operator’s hand to slide forward or back as he needed more or less water. This lever operated a cable that was attached to the solution valve above the brushes. Outside of an occasional corrosion issue after 10 years or so this was very reliable.

The vacuum motor that was used to remove the dirty water from the floor was operated by one switch on the dashboard. On or Off, that was it.

The first machines used the weight and pressure of the brushes to propel the machine forward so very little maintenance was required. There was no drive motor to worry about.  You can still find some brush driven scrubbers today but most are powered by drive motors forward and reverse.

So you can see, when I get a request for a service call today, the reasons why haven’t changed a whole lot. The scrubber isn’t putting down water, it’s not picking up water, it’s not cleaning the floor properly or it’s not moving forward or reverse. These are the issues we hear most often. As the machines continue to evolve mechanically and electronically they become more complicated to service. They are also much more ergonomic, easier to use and produce less stress on the operator.

When purchasing an automatic floor scrubber, please take these aspects into consideration. Scrubbers are made to pick up all the dirt on the floors most people want to avoid. This dirt has to go somewhere and that is the inside the machine. They must be cleaned out on a routine basis to perform well. The four areas we addressed here are the most commonly heard issues for maintenance. Take care of these and you’ll get longer life out of your new purchase.

A good preventative maintenance program will help you prevent these problems and have less down time. Effective preventative maintenance has two big components; scheduled maintenance calls by a trained professional (monthly, quarterly, or semiannually depending on your needs) and daily routine maintenance done by you and your team.

For more details about our preventative maintenance program and service department please visit this page. Also be sure to check back or subscribe to the blog so you don’t miss parts 2 through 5 of this mini blog series on common problems with automatic floor scrubbers!

image call to action for service and preventative maintenance